Whether you are wanting to take some family photos at a get-together or you want some greenery for your prom photo backdrop, anyone with a camera needs to look no further than your backyard.
Backyards are either nonexistent, concrete city jungles or luscious greenery filled with country-esque decoration. It doesn't matter which you have because you can utilize any and everything in the backyard for the perfect photography location.
For instance, look no further than your driveway. Do you, friends, or a family member drive an visually attractive vehicle? Go for portrait pictures with the vehicle.
Angela came over with her Mustang, so we took a few edgy photographs. The car was inspiration enough with its sleek black paint job and shiny rims. Get creative by asking your subject to lay across the hood or kneel in front of the car grill to give the photo a different look.
Also, you can use any fences, walls, or buildings as backdrops for your photos. A brick wall isn't a background that lacks creativity if you use it right.
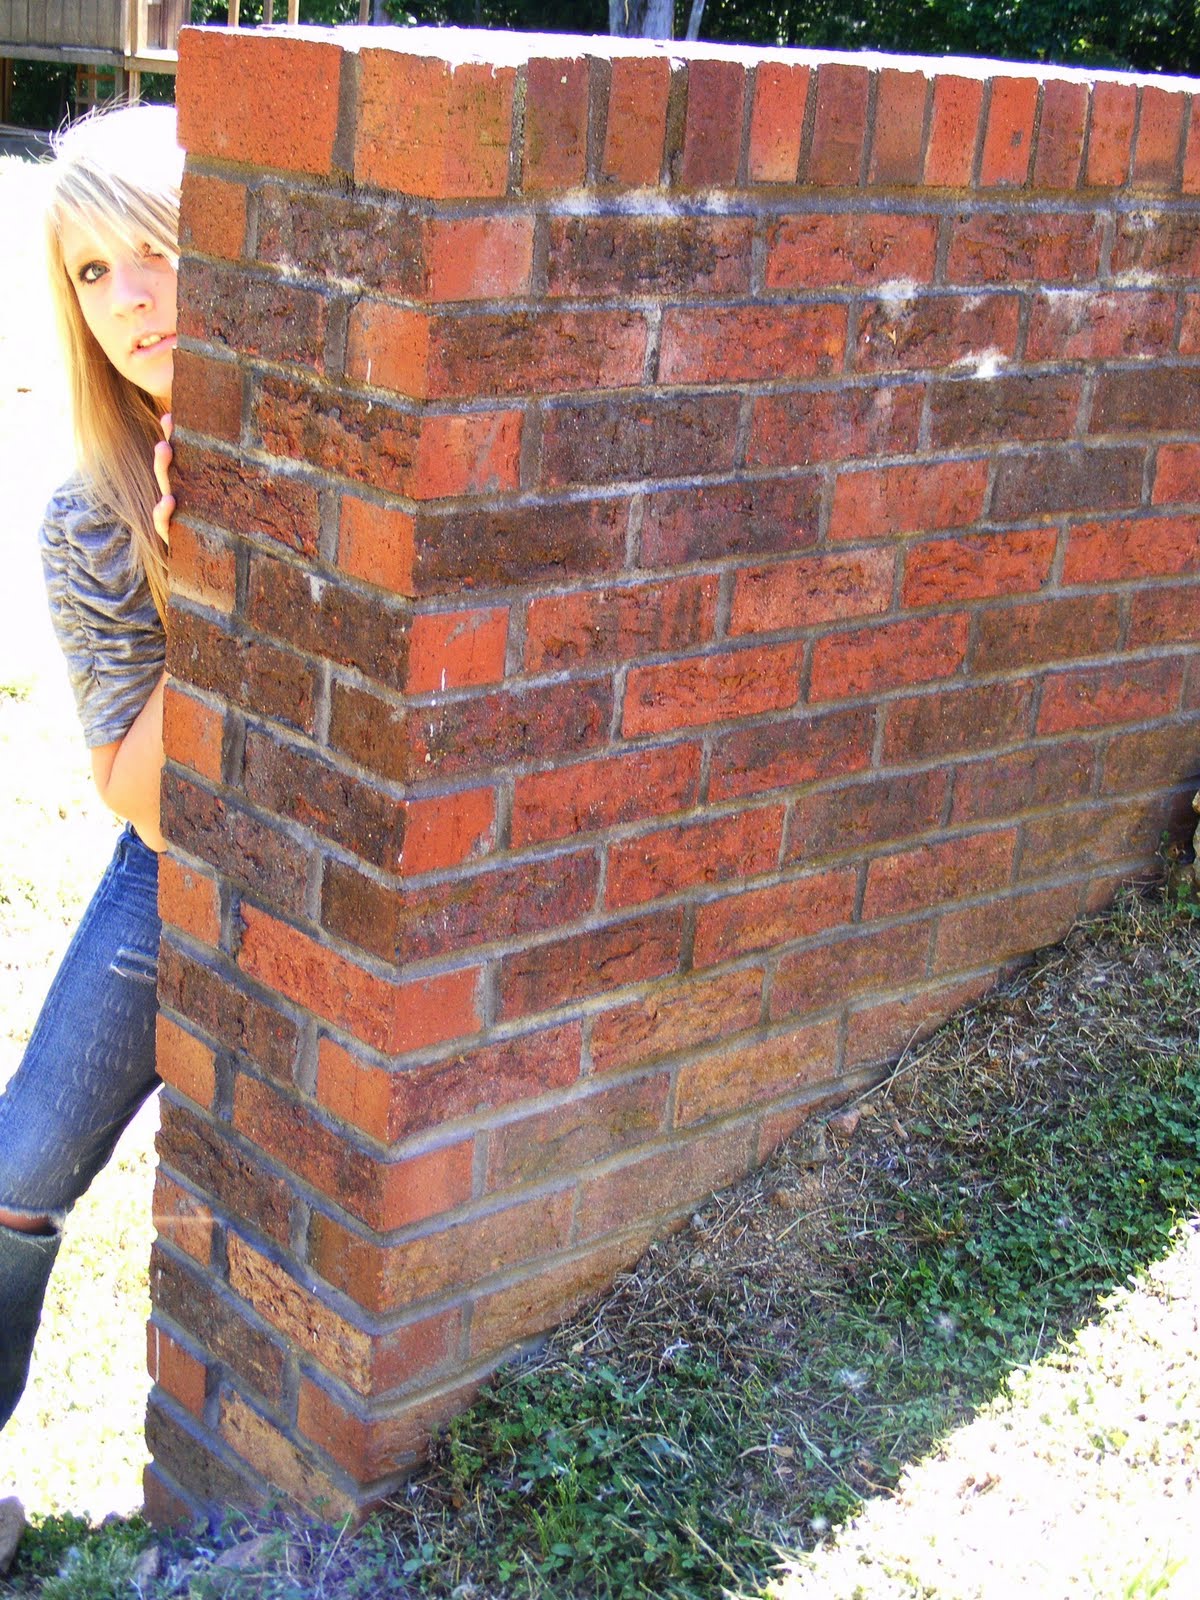
Take pictures with your subjects sitting in front of the backdrop, or if you have the opportunity try for a unique pose where your subject peeks behind the wall. It's a little mischievous.
Vinyl home siding, cinder block-built walls, wooden and wire fencing all can contribute to a great photograph.
Finally, look for one distinct item that you have in your backyard. Items to think about: birdbaths, statues, windmills, fountains, shrubbery, flowering trees and bushes, and lights (just to name a few.)
I was fortunate enough to have a decorative light pole to use. To utilize the length of the pole, I laid down in the grass to get this shot. Sometimes you've got to be willing to get dirty to get a decent shot. Be sure to look in your viewfinder to check out the right angles on your object, but don't be afraid to snap other angles to try them out. Sometimes the accidental shot or the shot just-for-fun is the best of the bunch.
Another shot (I haven't been able to do yet) is to do a semi-closeup on someone lying down in grown-out grass or weeds. The photographer would be lying in the grass at face level with the subject and shooting through the individual blades of grass or weeds. Grass is nothing extraordinary for a photography shoot, but with the right angle and creativity it could be a beautiful shot. Remember if you are going to try this photo to focus on the subject's eyes and no where else.
I'll try it out and let everyone know how it went.
Don't be afraid to take chances and to use anything and everything to enhance your photographs background. The only bit of advice I can offer you is to watch out for distractions in the background when the focus is your subject. Portrait photos do not need to be overly busy, but can have some additions to add more for the eye to see. When there are too many things going on at once in a photograph, your eyes get lost and you can miss the most important person, the subject!
Check out this photo venue:
YOUR BACKYARD!
Tuesday, March 29, 2011
Tuesday, March 22, 2011
Combat Camera Shake
My biggest limitation in photography is camera shake. The unsteady hand or the uneven press of the shutter-release button can cause some unwanted blurryness in your photographs. I hate having to deal with great photographs that are ruined because of a little motion blur.
This photo of the Dale Earnhardt statue in Kannapolis, NC at a glance may not look blurred, but take a closer look at the eyes. The focus should be here but instead there is a faint blur. I expected this to happen because in order to get this photo I had to stand on my tip toes in front of the statue and take the picture way over my head. A monopod with a shutter button extension would have worked better.
If you're into taking scenic photographs or portraits, then you may want to think about investing in a tripod or a monopod to help with this problem. Depending on your needs, you can invest in a full-size tripod or a mini-tripod.
Tripods are not ideal when you need to move around, so you could think about purchasing a monopod. I use one of these and it works for me. I can carry it around and it's has adjustable height. However, the monopod is not ideal because of the camera being attached to the pole. You are unable to shoot in all directions.
Looking into some camera shake techniques to help my shooting, I came across this Youtube video on a cheap method to help with camera shake, when you don't want to use a tripod/monopod:
I have yet to try this method, but it got some pretty good reviews. I will post and let you guys know when I try it out, but in the mean time, please let me know if you've tried it out and how it worked for you.
Another method to reduce camera shake is to increase your shutter speed. On digital cameras with Tv mode, you can increase the shutter speed and the camera will adjust the aperture to insure correct exposure. Or, if you are using a point-ands-shoot camera that does not offer this mode, then go to scene selection mode and choose your Sports mode. This allows the camera to automatically increase the shutter speed and will often fire a flash. Both of these methods will cause the shutter to close faster and get rid of camera shake.
Camera shake is not the end of the world nor does it doom you to horrible photographs forever. You just need to figure out the best way to combat it for yourself. These tips are helpful starters and basic ways to stop camera shake.
Thursday, March 10, 2011
Hurley Park
Located in Salisbury, NC, Hurley Park is the optimum place to take photographs, especially in the Spring. The park seems to go on forever with green walking trails and small pond with geysers. Overlooking the pond is a long deck with seating that brings a new texture into the background. As you can see in the background of the unedited photo below, a high school student was using the park for prom photos.
Trees shade the perimeters of the walkways and can add a new depth to your photographs. Sisters Angela and Heather Bailey took advantage of greenery.
Angela (below) found a beautiful flower to pose next too.
My absolute favorite spot is along the walking bridges. These bridges let you frame your subjects and give them something to hide behind if you want to focus on the head and shoulders or to combat shyness.
By the bridge, we located a interesting looking tree. The branches were perfect for seats and to get some unique photographs. I asked the sister if they would pose together in my favorite shot of the day:
Finally, the most whimsical part of the part are the Weeping Willow trees near the pond. You can utilize these trees as beautiful backgrounds or get your subject within the branches. Nevertheless, you can always use to the trees to take a break from shooting on a hot, sunny day -- that's what we did.
For this shoot, I used a point-and-shoot FujiFilm camera, which is a little different than the Canon Rebel XS DSLR that I use now. The camera was easily portable, but was overall slow compared to the camera I use now; however, I always grab my Fuji just in case I spot something while I'm out. It's always good to have a point-and-shoot backup because it's easier to toss in your bag than a DSLR.
These pictures are from my first ever photo shoot. I didn't know as much about cameras as I know now, but as you can see, you can still get beautiful photos as long as you use your imagination in your venue.
Hurley Park is a wonderful start for anyone who wants to take some photographs.
Be sure to check out this venue:
Hurley Park
302 West Franklin Street
Salisbury, NC 28144
Wednesday, March 9, 2011
Riverside
Riverside, Jacksonville, FL
As an extension of my previous Jacksonville experience, I chose to include a different type of photo shoot that I was lucky enough to capture.
Fellow conference attendee Katie Zink decided that she wanted to get a tattoo, while in Jacksonville. After much deliberation on the best way to find a tattoo parlor, we decided to find the closest place and walk there. Lucky us, the closest place was two miles and apparently over the river. After we made it over the river, the trip seemed to be more than two miles for a tattoo parlor Caribbean Connection.
Riverside had more of a historical feel than the Jacksonville Landing. We were surrounded by greenery, historic homes, and quaint shops.
Finally, we made it to the shopping strip that included the tattoo parlor. Hot, sweating, and extremely tired we finally made it only to find that the tattoo parlor was no longer in business.
We were extremely lucky that the 8th Day Tattoo had opened just across the street. Katie was able to go in and explain what she wanted and get a price quote.
Travis, her tattooist, immediately began prepping her for her first tattoo. He was extremely thorough, and I would recommend him to anyone in Jacksonville, FL. Photographs of Travis and Katie were a different take on portraits. They were not posed, but moments captured in time. Sometimes the best photographs are those that are not planned, but having the photographer in the right place at the right time.
More action-oriented photographs give the subjects and the scene a more realistic feel. I would suggest that anyone who wishes to get into photography not to limit themselves to only one style. Strengthen the one that you do best, but do not rule out the other.
Riversidewas a wonderful place to grab some interesting photographs.
Labels:
foot tattoo,
frog tattoo,
historic photos,
Jacksonville Florida,
photo story,
Riverside,
tattoo,
tattoo photos
Jacksonville Landing
Jacksonville Landing, Jacksonville, FL
Recently, I was lucky enough to attend a conference in Jacksonville, FL. Although, I did not have enough time to go out and take portrait photographs, I was able to take some scenic photographs. The city blocks around the landing have buildings that would be the perfect backgrounds for portraits.
Above is a building view from my hotel room. As you can see there are so many different styles of buildings that you could utilize. Keep something like this in mind when you're choosing locations in your neighborhood or city. My personal favorite was the animal print building that I was lucky enough to see in person; however, it was dark out and the photograph would not have done the colors justice.
At the Landing, there are beautiful bridges to use as backdrops as well as the blue water between the Landing and Riverside.
The waterfront Hyatt Regency Hotel provides guests with a large fountain that anyone can use for photographs.
I was disappointed that I didn't get better photographs of actual people at these places, but I was truly inspired by Jacksonville, FL.
The Jacksonville Landing has a plethora of photography shoot locations you just have to be willing to go out and find them.
Be sure to check out this venue:
Jacksonville Landing
2 W. Independent Drive
Jacksonville, FL 32202
Labels:
bridge,
city,
Jacksonville Florida,
Jacksonville Landing
Tuesday, February 22, 2011
Photography 101
In order to get the most out of taking photographs, it is important to understand some of the basic symbols, knobs, buttons, etc. of your camera. Let's go over the basics of the settings dial to get novices more in tune with their cameras.
Whether you have a point and shoot or SLR camera, you will more than likely be staring down at a dial that looks something like this:
AUTO is the basic mode on the camera where you do not have to do any of the thinking. The camera adjusts all the complicated settings that most camera users don't know how to tweak.
Av (Aperture) is the opening within your camera lens that controls how much light enters and hits the inner mirror to create a picture. You can also control the amount of blur in your photo background.
Tv (Shutter Speed) controls how fast the shutter opens and closes to capture a picture.
P (Program allows you to adjust the Av and Tv at the same time to insure the proper settings for a good exposure.
M (Manual) puts the responsibility of adjusting the Av and Tv independently to the photographer.
On the same dial, all digital cameras usually come with some preset settings for specific circumstances to insure properly exposed photographs.
Portrait (Face/Head) provides settings for the perfect soft light for smooth portraits.
Landscape (Mountain) settings allow for a sharper image of wide angle, landscape photos.
Party (Party Streamer) allows enough light to enter the camera for an indoors setting -- like a party -- to combat darker photos.
Night (Firework) sets the flash to fire to light up images where little to no light is available.
Sport (Runner) speeds up the shutter speed and fires the flash to freeze photo subjects in mid-motion.
Macro (Flower) adjusts the camera to focus on subjects -- such as a flower -- at extremely close distances.
Video (Video Camera) is available on most digital camera to record video with sound.
These are some of the basic settings on the digital camera's dial with descriptions for how to utilize each of these settings. If you have additional setting icons on your digital camera, you can consult your manual for reference.
Don't be afraid to adjust the settings to experiment with different styles of photographs. Sometimes it is better to learn by trial-and-error, and as long as you can always go back to AUTO mode to take photographs, you can never go wrong.
Labels:
camera controls,
camera dial,
camera functions,
camera info
Tuesday, February 15, 2011
Baker's Creek Park
Recently, I had the opportunity to take some portrait shots of a very good friend for a class project. She had the idea of taking the shots at Baker's Creek Park in Kannapolis, NC. I always give every venue a chance, and I was blown away by the photos opportunities that this park had to offer.
They have a playground for children, putt-putt course, baseball field, tennis court, basketball court, volleyball court, picnic areas, lots of trees, a creek, tunnels, and walking trails. All of these places have plenty of opportunities to get creative.
The trees provide the perfect backdrop to add character for any portrait without being too distracting.
I mentioned that the park has a creek, hence the name. Depending on the amount of rain the area gets, the creek is either shallow or completely full. For the best results, look at taking photos when the creek is shallow. The large, shelf-like rocks are the perfect place to have someone sit for photographs. There is actually an area with a small waterfall that is perfect.
Also, all around the creek are additional rocks that can be used as props or sitting areas for your photos.
Finally, I was elated to find this spot at the park. Water flows into the creeks through man-made tunnels. Although extremely exciting to tackle and be adventurous in there are a few things that I want to remind everyone of:
1) Always wear your get-wet shoes when out shooting.
I wore Sperry Topsider shoes on this outing and managed to fully submerge them both in the creek water and sand. Even though they can get wet, it wasn't fun walking around the rest of the time in soaked shoes. I suggest some type of rainboot to fend off water.
2) Carry a first-aid kit with you at all times.
Being adventurous and climbing into the tunnels was fun, but it was also dangerous. I slipped and cut one of my fingers on the jagged contents of the tunnel walls. Having anti-bacterial sanitizer helps to prevent infections in sanitation-questionable areas.
The tunnels proved to be worth it after all of the hassle. I was able to get some great photos and it provided a scene that was fresh and new. The end product was wonderful.
Whether you take advantage of the dark tunnel for lighting purposes (like above) or for the texture (below), you can really get some great shots.
Baker's Creek Park is a wonderful place to enjoy the sunshine and snap some photos.
Be sure to check out this venue:
Baker's Creek Park
1275 W A St, Kannapolis, NC 28081
Subscribe to:
Posts (Atom)

